Web Drafter User Guide
Web Drafter is a patent drafting workspace. Open a named project, provide your inputs once, and generate a complete patent specification—either in a single pass (One-Shot mode) or one section at a time (Step-by-Step mode). Either way, the output is editable directly in your browser, with AI chat and accept/reject review on every section, before you download it as a Word document. This guide covers projects, both drafting modes, all input fields, drawing input, custom document formats, and tips for best results.
Overview
Web Drafter creates a complete patent specification from your invention description and claims, and then keeps it editable—on screen, with AI assistance—until you're ready to download. Two drafting modes share the same project inputs and produce the same document structure, so you can switch between them at any time without re-entering anything.
Key Features
- Named projects that save your inputs and drafts across sessions
- One-Shot mode: complete draft in a single pass, editable on the page afterward
- Step-by-Step mode: build and review the document one of 13 sections at a time
- Section Chat with accept/reject/reset review on every section, in both modes
- Drawing input from Word, PowerPoint, PDF, or images, with a manual box-define crop tool
- Custom document formats and reusable format templates (expert/team accounts)
- Any language supported
- Voice dictation on every text field and chat box
- Optional password protection for the downloaded document
- Background-resilient generation: a One-Shot run keeps going even if you log out or switch projects
Projects
All work happens inside a named project. The project bar sits at the top of the workspace and is visible in both drafting modes.
- Create: Start a new project to begin a fresh draft with empty inputs.
- Rename: Give the project a memorable name (e.g. the invention's working title).
- Duplicate: Copy a project's inputs and drafts to branch off a variant without touching the original.
- Delete: Remove a project you no longer need.
Your Inventor Input, Extended Claim Set, Final Claims, language, drawings, and passcode are the same autosaved fields in both modes—switching from One-Shot to Step-by-Step (or back) on the same project never re-asks for input, and any section drafts you've generated or edited stay with the project.

Input Fields
Required Fields
1. Inventor Input (preferably max 5,365 words)
Enter your detailed invention description. This is the primary source for generating the patent specification.
Include:
- A description of the invention. The clearer, the better.
- A description of the prior art, if known
- Important! At least a short description of the Figures, if any will be uploaded, with numbers (Fig. 1, Fig. 2, etc.)
- Any experimental data or examples
Note: No need to include reference numbers here—those go in the Extended Claim Set.
2. Extended Claim Set (preferably max 2,813 words)
Enter all claims including fallback positions. These claims inform the detailed description but are not the final claims section.
Requirements:
- Dependent claims must start with "The" (e.g., "The device according to claim 1...")
- Include reference numbers in parentheses (10), (20), etc.
- Include all fallback positions you want in the description
Tip: Use Claim Drafter to prepare this claim set with proper formatting and reference numbers.
3. Final Claims
Enter the claims for the patent's claims section. These are copied verbatim into the output document.
Note: These may differ from the Extended Claim Set. The Extended Claim Set informs the description, while Final Claims appear in the claims section.
Optional Fields
4. Patent Language
Specify the output language (e.g., "Finnish", "German", "French", "Japanese").
- Leave empty for English
- All headings and standard text will be in the specified language
- Technical content will be generated in the specified language
5. Drawing Upload
See Drawing Input & the Box-Define Crop Tool below for accepted formats and the crop tool.
6. Passcode (Optional)
Set a password to lock the generated Word document.
- If set, the .docx file will be password-protected
- This is a user-controlled, optional layer of protection for the generated document—use it when you want an extra measure of control over document access
- Store your password securely—it cannot be recovered
Voice Dictation
Every text field and chat/instruction box carries a microphone button. Click to record, click again to stop—the transcript is inserted at the cursor so you can review and correct it before it's used. The microphone button only appears in a secure browser context (https, or localhost).
Drawing Input & the Box-Define Crop Tool
Web Drafter accepts drawings as Word, PowerPoint, PDF, or image files, with a size allowance well above the old single-.docx limit (currently up to 25MB). Two paths are available, and you choose between them at upload time:
- Automatic extraction (default): for a single .docx with one image inserted per figure, Web Drafter extracts each image automatically—no manual step needed.
- Box-define (manual): for PowerPoint, PDF, images, or any .docx you'd rather define by hand, an in-browser crop tool renders each page and lets you drag a box around each figure to mark it as Fig. 1, Fig. 2, and so on.
Once figures are defined, either path:
- Analyzes figure content and identifies elements
- Generates figure descriptions with proper reference numerals
- Coordinates figure references throughout the specification
- Ensures consistency between drawings and written description
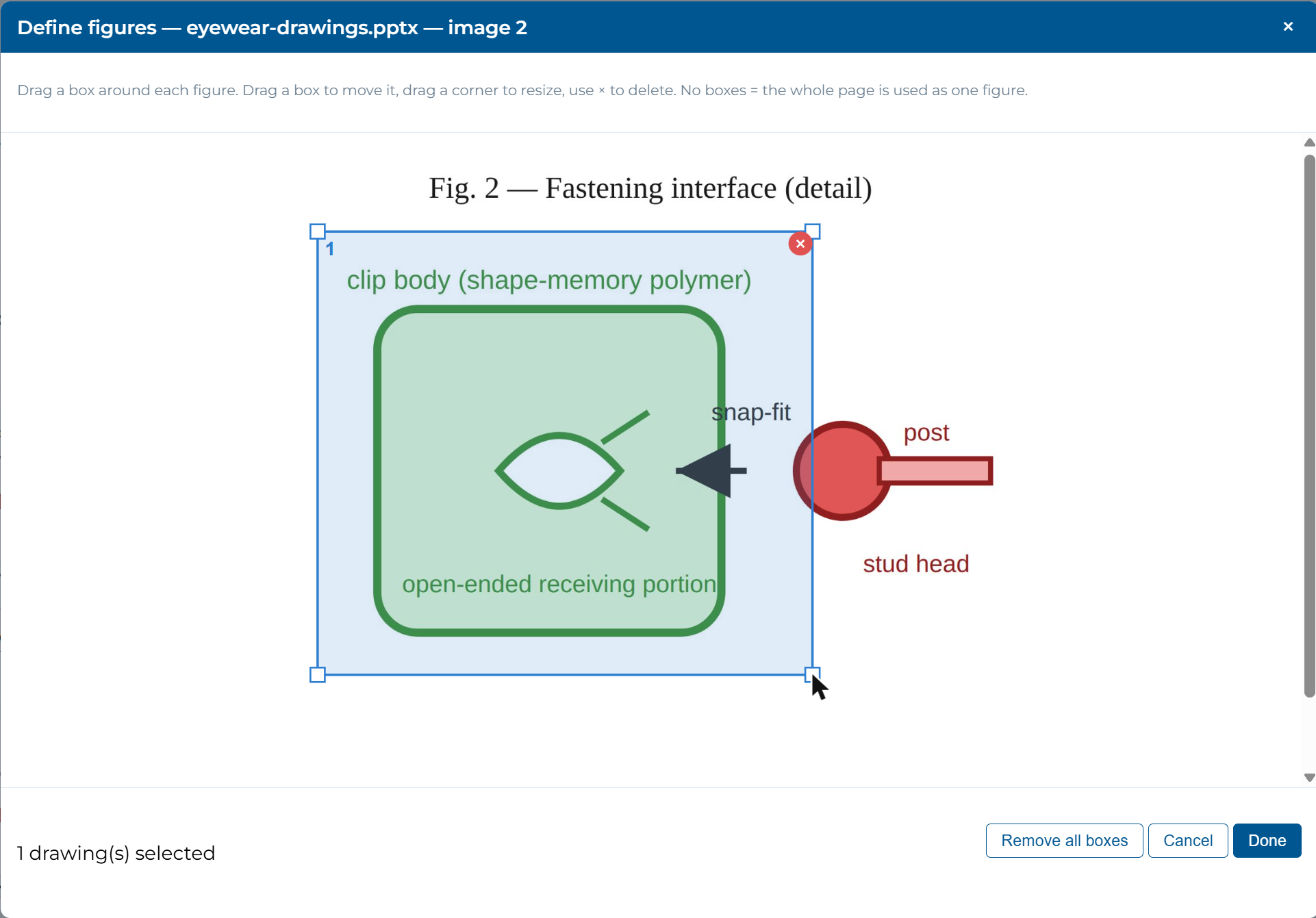
Important: Close the drawing file in any other application before uploading it. If the file is open elsewhere, the upload may fail.
Reference numbers in drawings are optional but, if present, should match the Extended Claim Set. Drawings can be in color, grayscale, or black and white.
One-Shot Mode
One-Shot mode generates the complete document from a single form submission.
Step 1: Fill in the Form
- Enter your Inventor Input (required)
- Enter your Extended Claim Set with reference numbers (required)
- Enter your Final Claims (required)
- Optionally specify the language
- Optionally upload drawings
- Optionally set a passcode
Step 2: Submit and Wait
- Click Submit to start generation. Processing takes up to around 30 minutes.
- Watch the progress bar for real-time updates as each section is generated.
- You do not need to keep the tab open: generation continues in the background even if you log out or switch to another project. If you come back mid-run (or right after one finishes), a resume banner picks it back up so you never lose a draft in progress.
Step 3: Review and Edit On Screen
When generation finishes, the document does not just download—it renders as a set of editable, auto-growing text sections directly on the page. From here you can:
- Edit any section's text by hand, directly in the box
- Open Section Chat on a section to ask a question or request a revision (see Section Chat & Track-Changes Review)
- Leave sections as generated if no changes are needed

Step 4: Download
Two downloads are always available, and they are independent of each other:
- Current edits: a fresh .docx built from exactly what's on screen right now, including any hand edits or applied chat revisions.
- Original: the exact file generated at the end of processing, untouched by any later edits.
Step-by-Step Mode
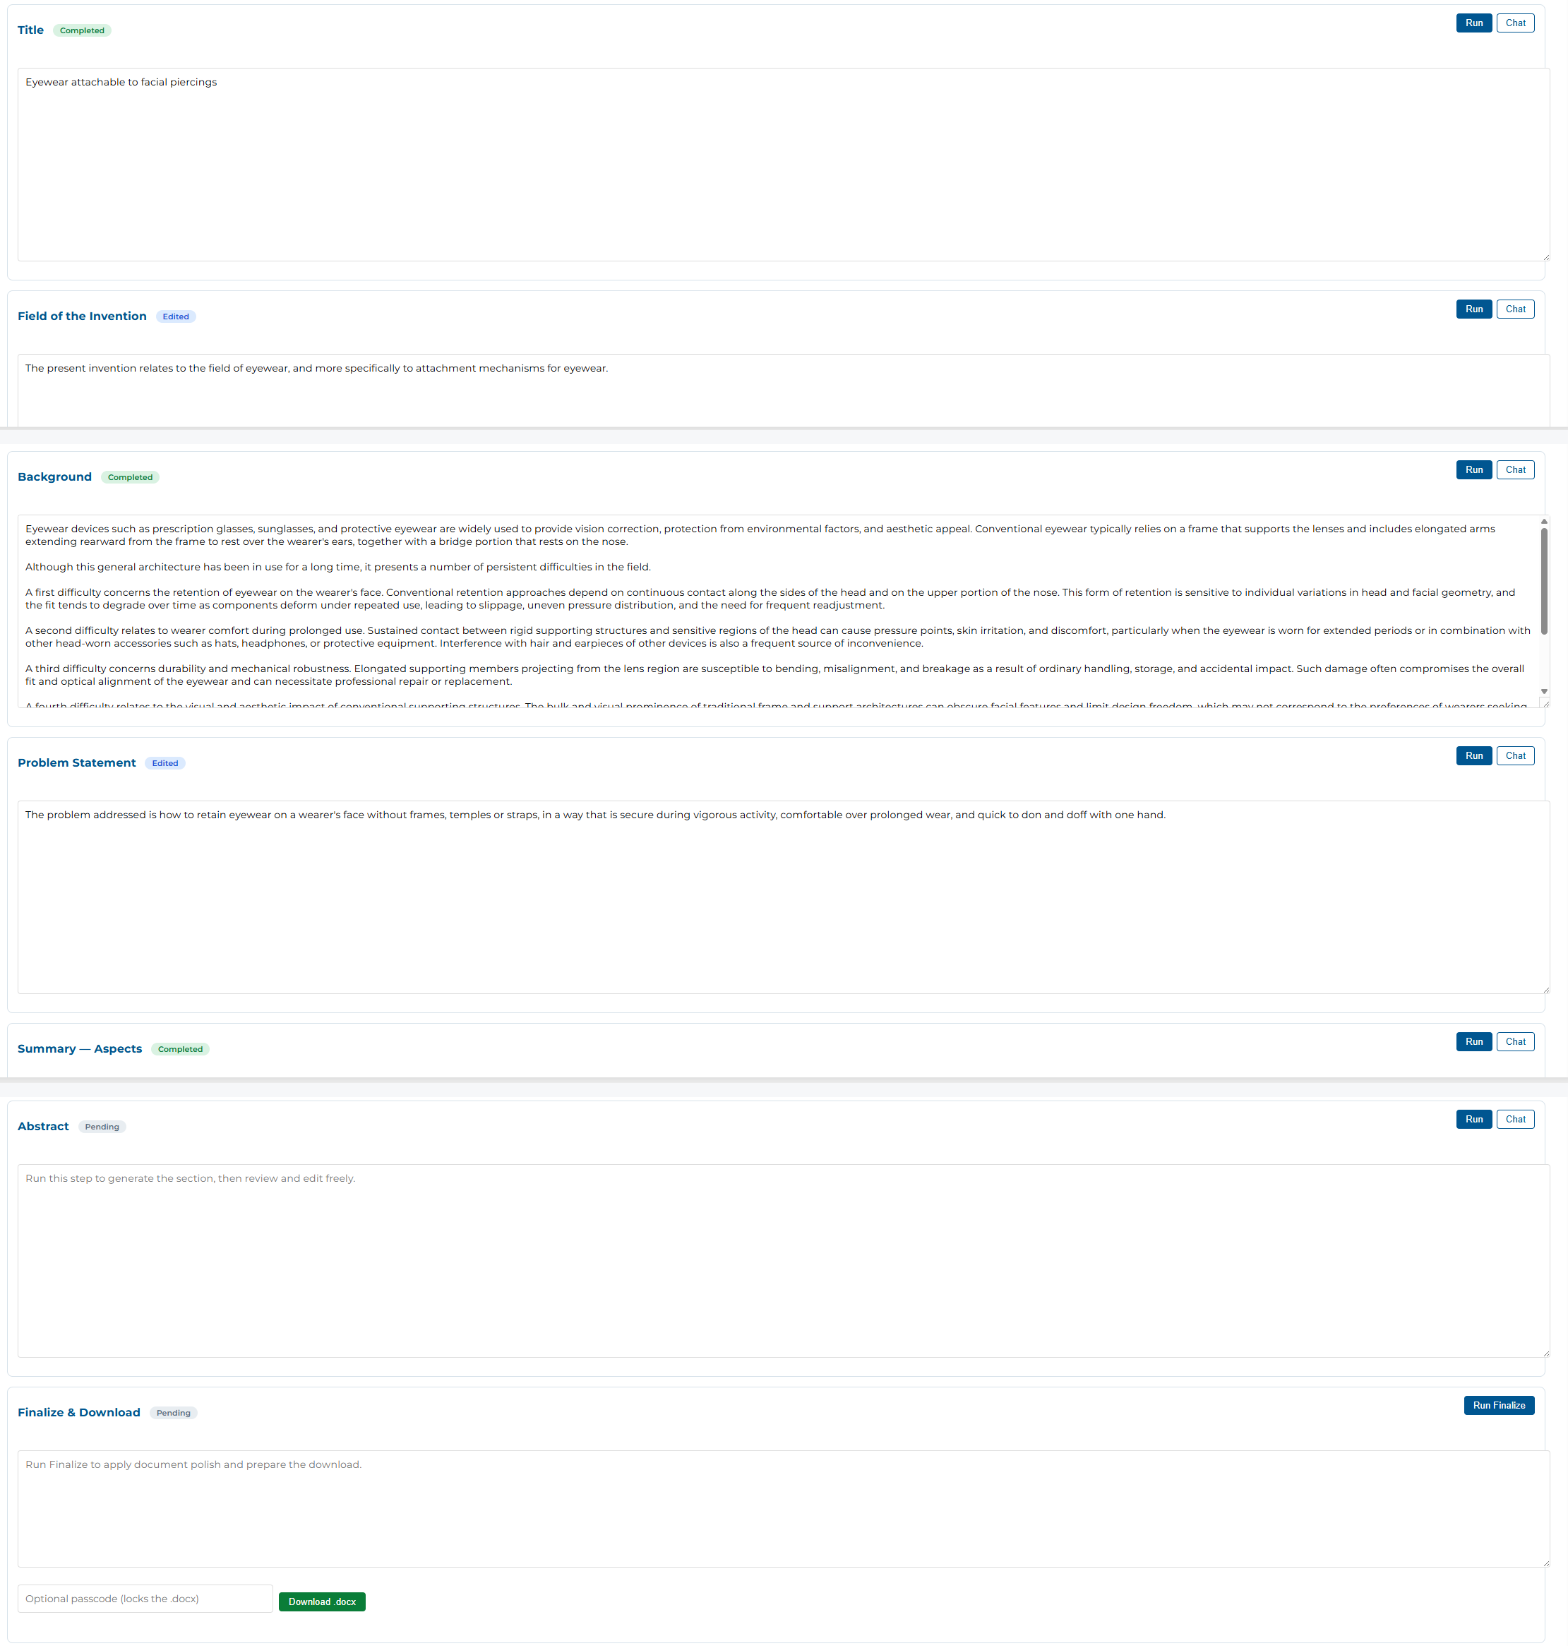
Step-by-Step mode builds the same document as One-Shot mode, but one of 13 sections at a time, followed by a Finalize pass.
How It Works
- Each section has its own Run button and its own status: Pending (not yet generated), Completed (generated, unedited), Edited (you changed the text by hand), or Needs Review (an earlier dependency changed since this section was generated).
- Generate sections in order, or jump to any section you want to work on first.
- Each section can be hand-edited or refined with Section Chat independently of the others.
- If you hand-edit a section that a later section depends on (for example, editing Detailed Description before generating Term Definitions), running that later section prompts you to choose whether it should build from your edited text or the original AI output.
- A final Finalize step assembles and polishes the full document from your latest section content.
When to Use Step-by-Step Instead of One-Shot
- You want to steer or correct the Background or Detailed Description before later sections build on it
- You only need to redo one section rather than the whole document
- You'd rather review shorter, section-sized generations as you go than one long run
Section Chat & Track-Changes Review
Section Chat is available on every section in both modes, and works the same way in each:
- Open the chat panel on the section you want to discuss.
- Ask a question ("why is this phrased this way?") or request a revision ("add a fallback for the sensor being optional").
- For a revision request, the AI's proposed change is shown as a tracked edit—insertions and deletions marked inline—not applied to the section automatically.
- Review the proposed change and accept, reject, or reset it. Nothing is written to the section until you accept it.
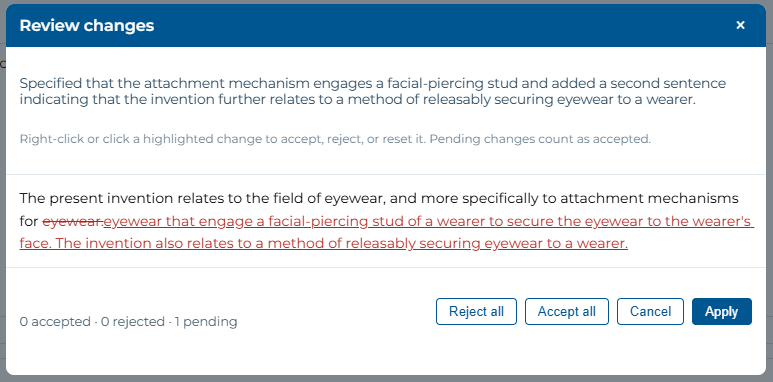
Because review happens before anything is written, you can ask the AI to try a revision, decide it's not what you wanted, and reject it without losing your original text.
Custom Document Formats
Expert and team accounts can customize the document structure per project in Step-by-Step mode, without changing the default pipeline used by everyone else.
What You Can Customize
- Add custom sections: a title and your own drafting instructions; they run, chat, and edit exactly like built-in sections.
- Hide optional sections: Term Definitions, Experiments, and Prophetic Examples can each be hidden from a given project.
- Reorder the document: drag sections into the order you want the final document to follow.
- Add instructions to a built-in section: layer extra drafting instructions on top of any built-in section's default prompt.
Saving and Reusing Formats
Save a customized structure as a named format in your account's format library, then apply it to future projects instead of rebuilding it each time. Formats are stored under your account and are subject to the same access-limiting design as your other project data.
Analyzing an Example Patent
Upload an example patent (.docx or .pdf) and Web Drafter can analyze its structure into a proposed format—which sections it uses, in what order, and where its phrasing deviates from the default. The proposal is always presented for your review; it is never applied automatically.

Note: If no custom format is applied to a project, the document is generated exactly as the default pipeline would produce it.
Generated Document Sections
Both drafting modes generate a patent specification with the following sections:
| Section | Description |
|---|---|
| Title | Appropriate patent title based on the invention |
| Field of the Invention | Technical field specification |
| Background | Technical context framed without hinting at the invention |
| Summary | Object of invention, claims as aspects/embodiments, advantages |
| Brief Description of Drawings | Figure descriptions coordinated with your drawings |
| Detailed Description | Thorough embodiment descriptions referencing the drawings |
| Further Embodiments | Additional embodiments from your invention disclosure |
| Experiments | Actual experiments derived from your input |
| Prophetic Examples | Conservative and expansive embodiments (with attorney warning) |
| Term Definitions | Extended claim interpretation section |
| List of Reference Numbers | Index of all reference numbers from claims |
| Claims | Your Final Claims verbatim |
| Abstract | Patent abstract (<150 words) |
In Step-by-Step mode, Term Definitions, Experiments, and Prophetic Examples can be hidden per project via a custom format (see Custom Document Formats); by default all of the sections above are included.
Settings & Options
Model Selection
Web Drafter offers two model paths.
- If your account has additional model access, click "Advanced options" in the sidebar to reveal the model dropdown.
- EU-hosted open-source – processing on EU infrastructure.
- Frontier models – Gemini, GPT, Claude, where enabled for your account.
- If "Advanced options" is not shown, your account is set to a single model path.
Credits & Time Remaining
- Check your current credit balance in the sidebar.
- Click "Time Remaining" to view your active 24-hour usage window after a credit is first used.
- The same 24-hour window covers both One-Shot generations and Step-by-Step section runs/chat.
Tips for Best Results
Inventor Input Quality
- More detail = better output. The more comprehensive your description, the richer the generated specification.
- Include all embodiments and variations you want covered
- Describe figures clearly with "Fig. 1 shows...", "Fig. 2 illustrates..."
- Include any experimental data
Extended Claim Set
- Use Claim Drafter to generate a comprehensive claim set
- Include all fallback positions—these become description content
- Ensure reference numbers are consistent throughout
- Format dependent claims properly ("The device according to claim 1...")
Drawings
- Close the drawing file before submitting
- A single .docx with one distinct inserted picture per figure is extracted automatically; anything else goes through the box-define crop tool
- Reference numbers in drawings are optional but if present, they should match the Extended Claim Set
- Drawings can be in color, grayscale, or black and white
Choosing a Mode
- Use One-Shot for a fast complete draft you'll then edit as a whole
- Use Step-by-Step when you want to steer early sections (like Background or Detailed Description) before later sections build on them, or when you expect to redo only part of the document
- You can switch modes on the same project at any time—your inputs carry over either way
Section Chat
- Be specific in revision requests ("add a fallback for X being optional" works better than "improve this")
- Always review a proposed edit before accepting it—reject and try again with a clearer instruction if it's not right
- Use "reset" if you want to discard a proposed edit and keep discussing before trying again
Language
- Leave empty for English output
- Just type the name of the desired language
Password protection
- Use password protection if you want an additional user-controlled layer of protection for your output
- Password protection is optional and primarily serves as an extra security measure under your control
- Store your password securely—it cannot be recovered
Troubleshooting
| Status stuck on "Submitting..." | Close the drawing file and resubmit |
| Status doesn't switch to "PROGRESS" | Ensure drawing file is closed, then resubmit |
| A One-Shot generation seems to have vanished after I logged out | Log back in and open the project—a resume banner surfaces any generation that was still running, or that finished while you were away |
| A later Step-by-Step section shows "Needs Review" | An earlier section it depends on was edited after this one was generated. Re-run the section and choose whether to build from the edited or original upstream text |
| Error: Malicious content detected | Your input may contain prompt injection patterns. Contact support if this is an error. |
| Error: Insufficient credits | Purchase additional credits to continue |
Credit Usage
- Cost: 1 credit (100 EUR) for 24-hour unlimited use
- Generate as many documents as needed within 24 hours, in either mode
- Check your credit balance in the sidebar
- Click "Time Remaining" to see your 24-hour validity countdown