Claim Drafter User Guide
This guide provides detailed instructions for using all 11 modes of Claim Drafter. Follow the recommended workflow for best results, or jump to any mode as needed.
Recommended Workflow
Claim Drafter guides you through a structured patent claim development process. The recommended order is:
- Determine Problem
- Draft Claim 1
- Draft Independent Claims
- Extend to 15 Claims
- Extend to as Many Claims as you can → Add numerous fallbacks in claim language. Useful as input for Web Drafter.
- Add Reference Numbers
- Generate Drawings → Create patent drawings from claims
Data transfers automatically between modes, so your outputs become inputs for the next step
Steps can be skipped
Make Drawings B/W → Independent mode that converts color images to patent-compliant B/W
Convert for Another Jurisdiction → Independent mode that rewrites an existing claim set to another patent office's formal requirements
Add Reference Numbers to Drawings → Independent mode with a manual editor for placing reference-numeral call-outs directly on a drawing image, plus an AI-assisted review pass
Every main drafting mode accepts PDF, Word, or PowerPoint uploads, and every chat box and free-text field has a microphone button for voice dictation.
Mode 1: Determine Problem
Purpose
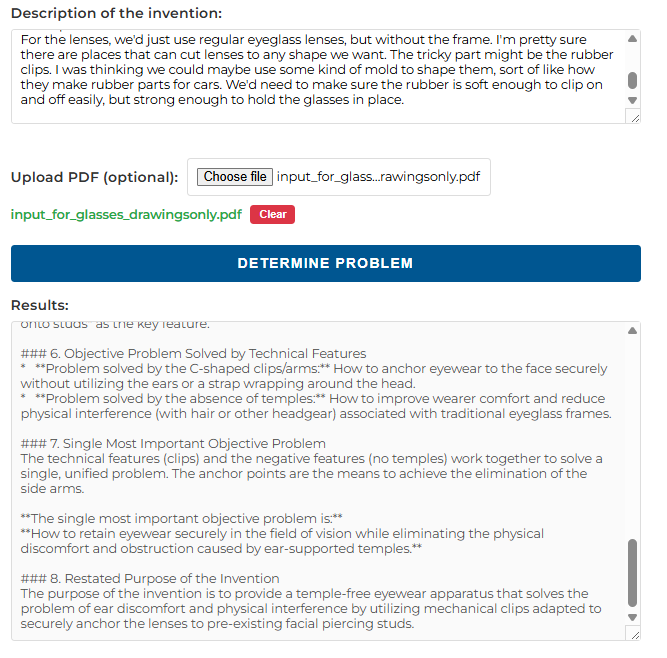
Analyze your invention disclosure to identify the objective technical problem solved, following the EPO problem-solution approach
Input
- Invention Description: Enter a technical description of your invention
- Document Upload (Optional): Upload a PDF, Word, or PowerPoint file with your invention description, drawings, or prior art. You can use text only, document only, or both together. The AI reads text and images from the file, and the PDF chat button lets you ask it questions directly.
Output
An objective problem statement and the AI's problem-solution reasoning behind it
Tips
- Edit by hand or use the chat feature to refine the problem statement
Mode 2: Draft Claim 1
Purpose
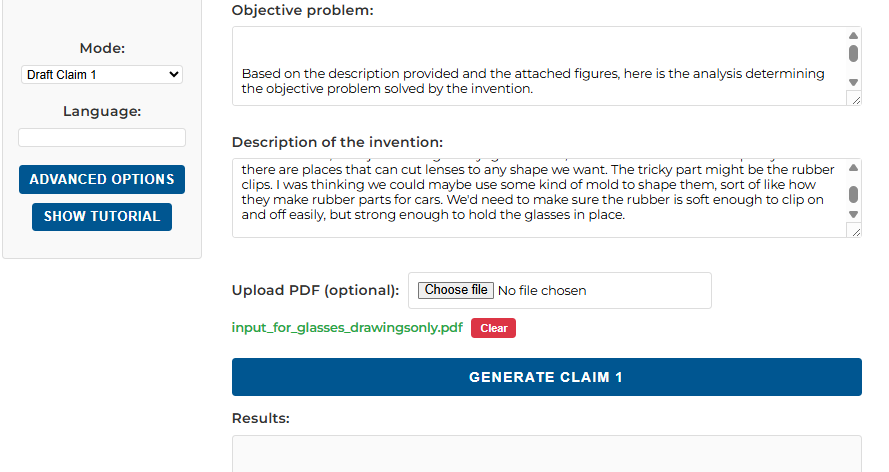
Generate your first independent claim based on the objective problem and invention description
Inputs
- Objective Problem: Auto-populated from Mode 1 (editable) or entered by you
- Description: Your invention description (synchronized across modes)
- Document Upload (Optional): Upload a PDF, Word, or PowerPoint file with additional details. You can use text only, document only, or both together.
Output
A first claim and the model's reasoning behind it
Tips
- Edit by hand or use the chat feature to refine claim 1
- Open a new window and run this mode with another model for a different proposal
Mode 3: Draft Independent Claims
Purpose
Generate additional independent claims covering different patentable aspects of your invention, including claims in other categories that may refer back to earlier claims where appropriate
Inputs
- Claim 1: Auto-populated from Mode 2 (editable) or entered by you
- Description: Your invention description
- Document Upload (Optional): Upload a PDF, Word, or PowerPoint file with invention details. You can use text only, document only, or both together.
Output
Multiple independent claims covering all aspects the model considers adequate, as well as the model's reasoning behind its choice. Claims in different categories may refer back to earlier claims where that is the cleaner drafting choice:
Tips
- Edit by hand or use the chat feature to refine these claims
- Open a new window and run this mode with another model for a different proposal
Mode 4: Extend to 15 Claims
Purpose
Build a complete claim set by adding dependent claims to your claims, while preserving valid cross-category references
Inputs
- Claims: Auto-populated from Mode 2 or 3 (editable) or entered by you
- Description: Your invention description
- Document Upload (Optional): Upload a PDF, Word, or PowerPoint file with invention details. You can use text only, document only, or both together.
Output
A 15-claim set with:
- All your input claims preserved
- Dependent claims properly narrowing each independent claim
- Valid cross-category references maintained
- Sequential numbering (1-15)
- Proper dependency chains
Tips
- Edit by hand or use the chat feature to refine these claims
Mode 5: Extend to as Many Claims
Purpose
Generating additional dependent claims from your invention description.
Inputs
- Claim Set: Auto-populated from Mode 2, 3 or 4 (editable) or entered by you
- Description: Your invention description
- Document Upload (Optional): Upload a PDF, Word, or PowerPoint file for additional context. You can use text only, document only, or both together.
Output
An extended claim set with:
- All previous claims preserved
- Additional dependent claims covering fallback positions for prosecution
Tips
- Use this extended claim set as input in Web drafter to generate fallbacks in the description
- These claims can be added during prosecution if needed
- Edit by hand or use the chat feature to refine these claims
Mode 6: Add Reference Numbers
Purpose
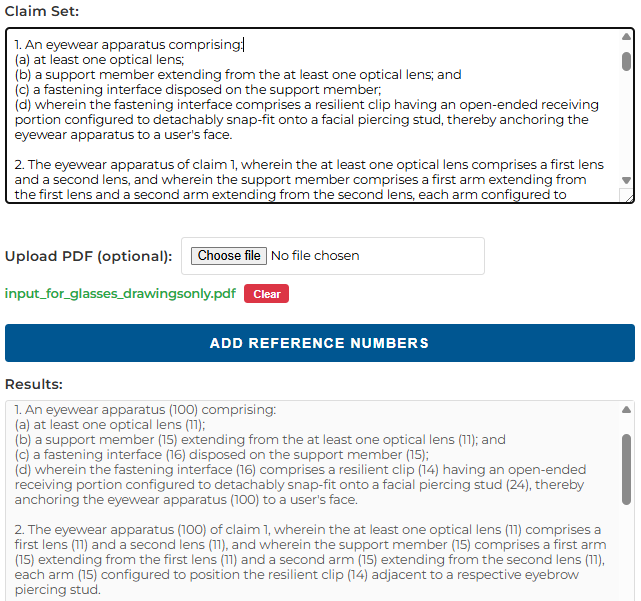
Insert parenthetical reference numbers into your claims to coordinate with patent drawings.
Input
- Claim Set: Auto-populated with the most comprehensive claim set available (extended > 15 claims > independent > claim 1)
- Document Upload (Optional): Upload a PDF, Word, or PowerPoint file with drawings. The AI can extract reference numbers from images. You can use text only, document only, or both.
Output
Claims with reference numbers in parentheses, e.g.:
- "a housing (10) comprising..."
- "a motor (20) connected to the housing (10)..."
- "a sensor (30) positioned within..."
Tips
- If you desire specific numbers, give instructions to this respect at the end of your input or in the chat feature after the generation
- Edit by hand or use the chat feature to refine the results
Mode 7: Generate Drawings
Purpose
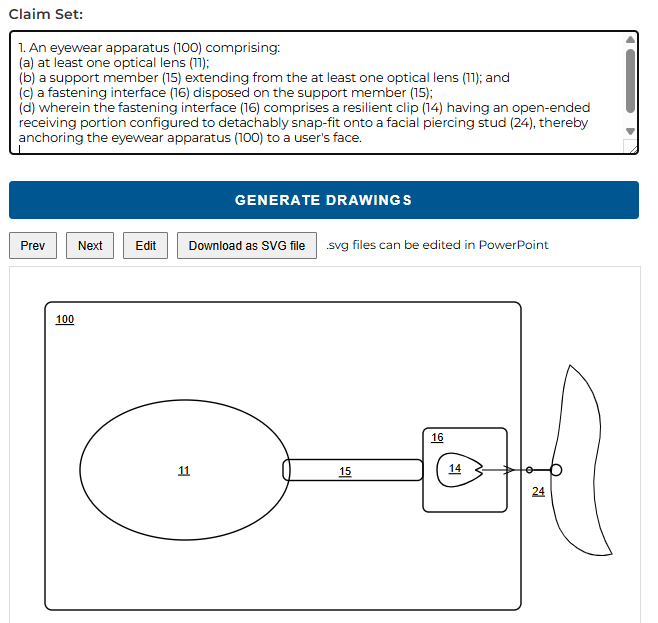
Create patent-style drawings directly from your claims with reference numbers, as SVG or PNG.
Input
Claim Set: Claims with reference numbers from Mode 6
Output
Patent drawings with:
- Schematic representations of claim elements
- Reference numbers matching the claims
- Multiple figures for different views/embodiments
Features
| Format Choice | Generate as SVG, or as PNG using a separate AI/commercial image model |
| Prev/Next Navigation | Browse multiple generated figures |
| Edit Mode | Click Edit to drag-and-drop elements, resize shapes, double-click text to modify (SVG output) |
| Download | Export the current drawing as an SVG file (editable in PowerPoint) or a PNG file |
| Chat Refinement | Request specific modifications via the chat panel, for either format |
| Undo | Revert the last chat-requested change |
Tips
- Generation may take a moment for complex inventions
- SVG output gives you the interactive Edit mode; PNG output goes through chat refinement instead
- Use Edit mode for interactive adjustments
- SVG files can be further edited in PowerPoint after 'ungrouping'
- Use a reasonably low number of claims (1-5) as input
- Chose well the claims you wish to be drawn
Independent Mode: Make Drawings B/W
Purpose
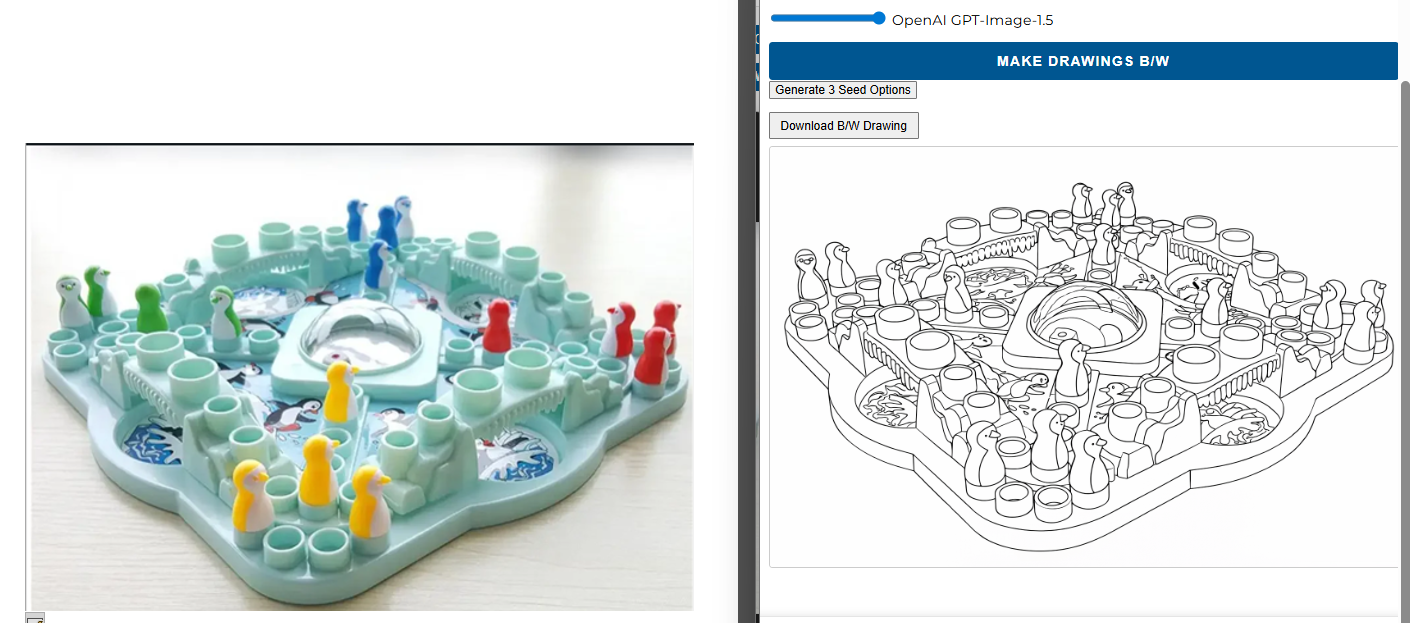
Convert color images to patent-compliant black and white line drawings. This is an independent mode that does not require completing the main workflow.
Inputs
- Drawing Files: Upload one or more color images, or a PDF, Word, or PowerPoint file to extract pictures from (multiple file selection supported)
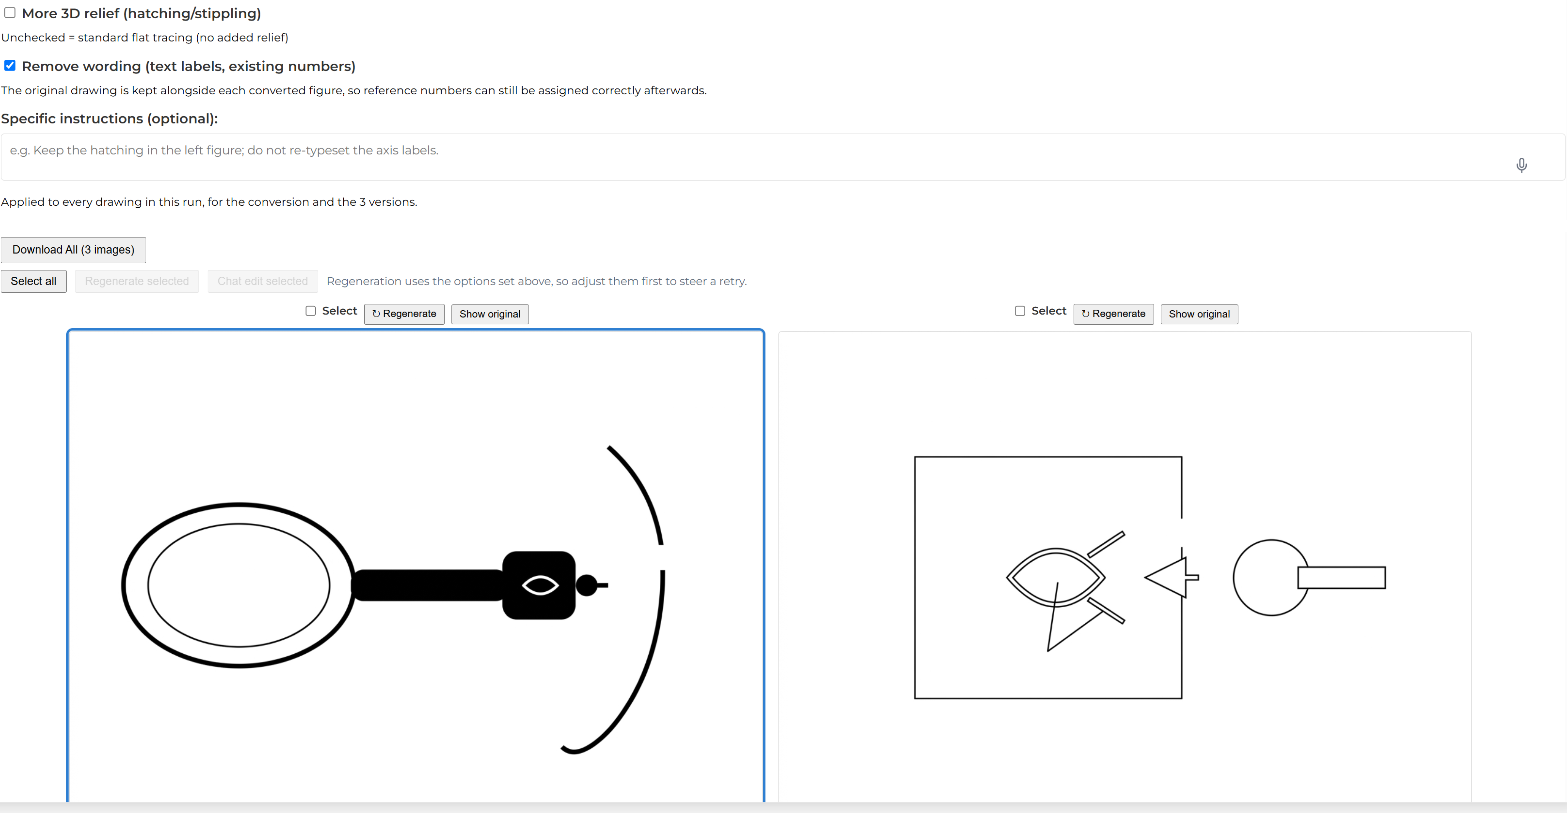
- Relief Option: Enable for 3D depth with hatching and stippling
- Remove Wording (default on): Cleanly strips existing text and reference numbers from the drawing so you can add your own in Add Reference Numbers to Drawings
- Instructions (Optional): Free-text guidance for this run, e.g. what to keep or what to remove
- Model Selection: Use the visible B/W Conversion Model dropdown. EU-hosted open-source is one of the available options, with additional models available depending on your account.
Output
Patent-compliant black and white line drawings suitable for filing.
Features
| 3D Relief | Adds hatching and stippling for depth perception |
| Model Choice | EU-hosted open-source is one of the available paths, with frontier or specialist alternatives available depending on your account. |
| Remove Wording | Cleanly strips existing text and reference numbers so you can add your own |
| Seed Options | Generate 3 style variations to choose from for a single drawing |
| Generate 3 Versions | Generate 3 full versions of the batch to compare side by side |
| Batch Processing | Convert multiple images with consistent styling |
| Per-Figure Regenerate | Re-run a single figure without redoing the whole batch |
| Show Original | Compare a converted figure against its original at any time |
| Batch Chat Edit | Select several figures and apply one chat instruction to all of them at once |
| Undo | Revert the last change, including a batch edit |
Tips
- Check carefully the convertion for errors
- Chat with the results to modify the drawings or add reference numbers
- Try entering a claim with reference numbers in the chat and ask the model to add those to the drawing
- If the input has hand-written reference numbers, they will be converted into printed ones
- Relief works best for converting edgeless 3D features; disable for most uses
- Turn on Remove Wording when you plan to add your own reference numbers afterward in Add Reference Numbers to Drawings
- Use Instructions to keep or remove specific labels the model might otherwise handle inconsistently
- Tick several figures and use batch chat edit to apply the same fix everywhere at once, instead of repeating it figure by figure
- Select figures and use "Add reference numbers" to send them on to the manual reference-numbering editor, or "Add to figure set" to include them in your export
Independent Mode: Convert for Another Jurisdiction
Purpose
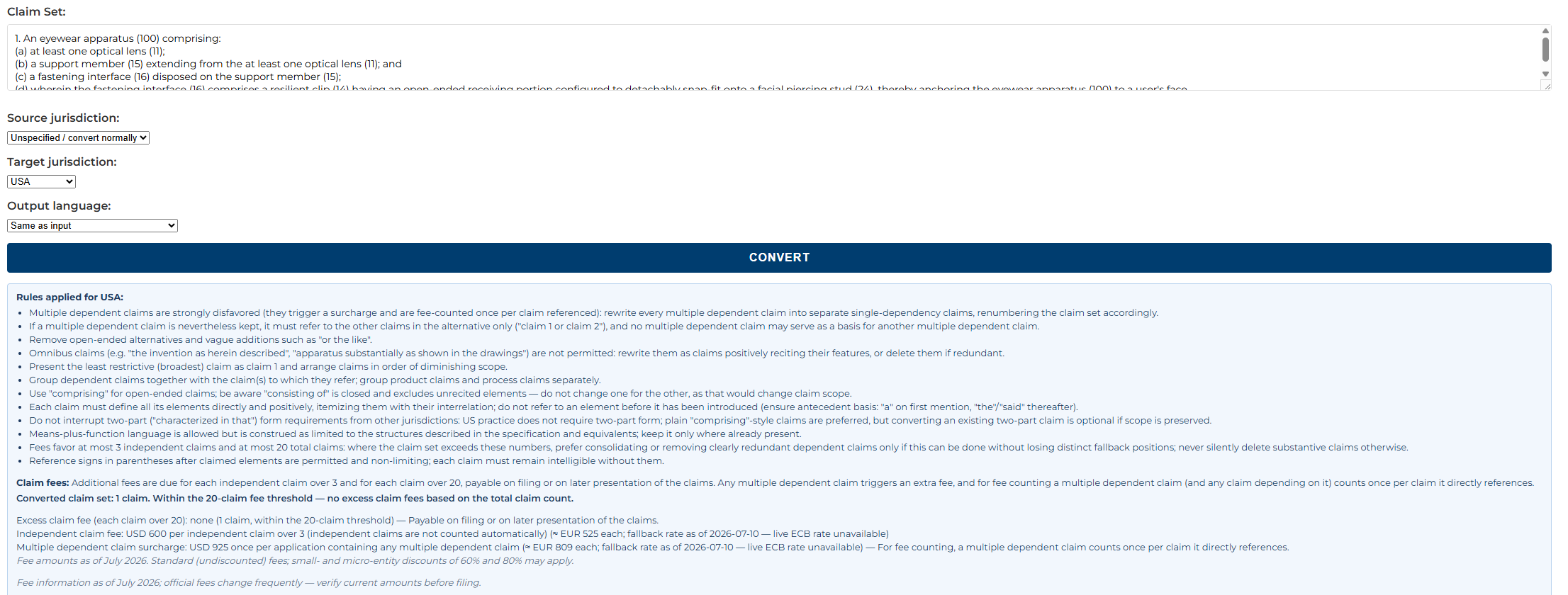
Rewrite an existing claim set to the formal requirements of another patent office. This is an independent mode that does not require completing the main workflow: select Convert for another jurisdiction in the mode dropdown.
Inputs
- Claim Set: Paste the claims to convert (any language)
- Target Jurisdiction: USA, EPO, China, Japan, South Korea, Canada, Brazil, India, Australia, Mexico, Singapore, or Indonesia
- Output Language: Same as input, English, or the language required by the target jurisdiction
Output
The converted claim set, together with an info panel showing:
- Rules applied: the target jurisdiction's claim-format requirements used for the conversion (dependency structure, multiple dependent claims, two-part form where required, and so on)
- Claim fees: an excess-claim fee summary for your claim count (e.g. fees above 20 claims in the US, from claim 16 at the EPO, above 10 in China), with the date the fee rules were last checked
Tips
- Review the converted set carefully — jurisdiction rules can require restructuring dependencies, which renumbers claims
- Substantive claims are never silently deleted to get below a fee threshold; consolidate manually if you want a cheaper claim set
- Fee amounts change regularly — check the "as of" date in the fee summary and verify current official fees before filing
- Use the chat panel to refine the converted claims, as in every other mode
Independent Mode: Add Reference Numbers to Drawings
Purpose
Place reference-numeral call-outs directly onto a drawing image, with a manual editor and an AI-assisted review pass. This is separate from Mode 6, which inserts reference numbers into claim text—this mode places them onto the figure itself. It is an independent mode: select Add reference numbers to drawings in the mode dropdown, or send figures to it directly from Make Drawings B/W.
Inputs
- Drawing Files: Upload black-and-white drawings as images, or a PDF, Word, or PowerPoint file—each page lands in a tray where you can crop out individual drawings and tick the ones to annotate; or send figures in from Make Drawings B/W
- Claim Set with Reference Numbers (Optional): Paste the claims so the editor knows which numbers to place
Output
Annotated drawings, downloadable as PNG or SVG, with:
- Reference numbers placed on or beside each feature
- Leader lines connecting numbers to features where needed
- Multiple figures browsable with Prev/Next navigation
Features
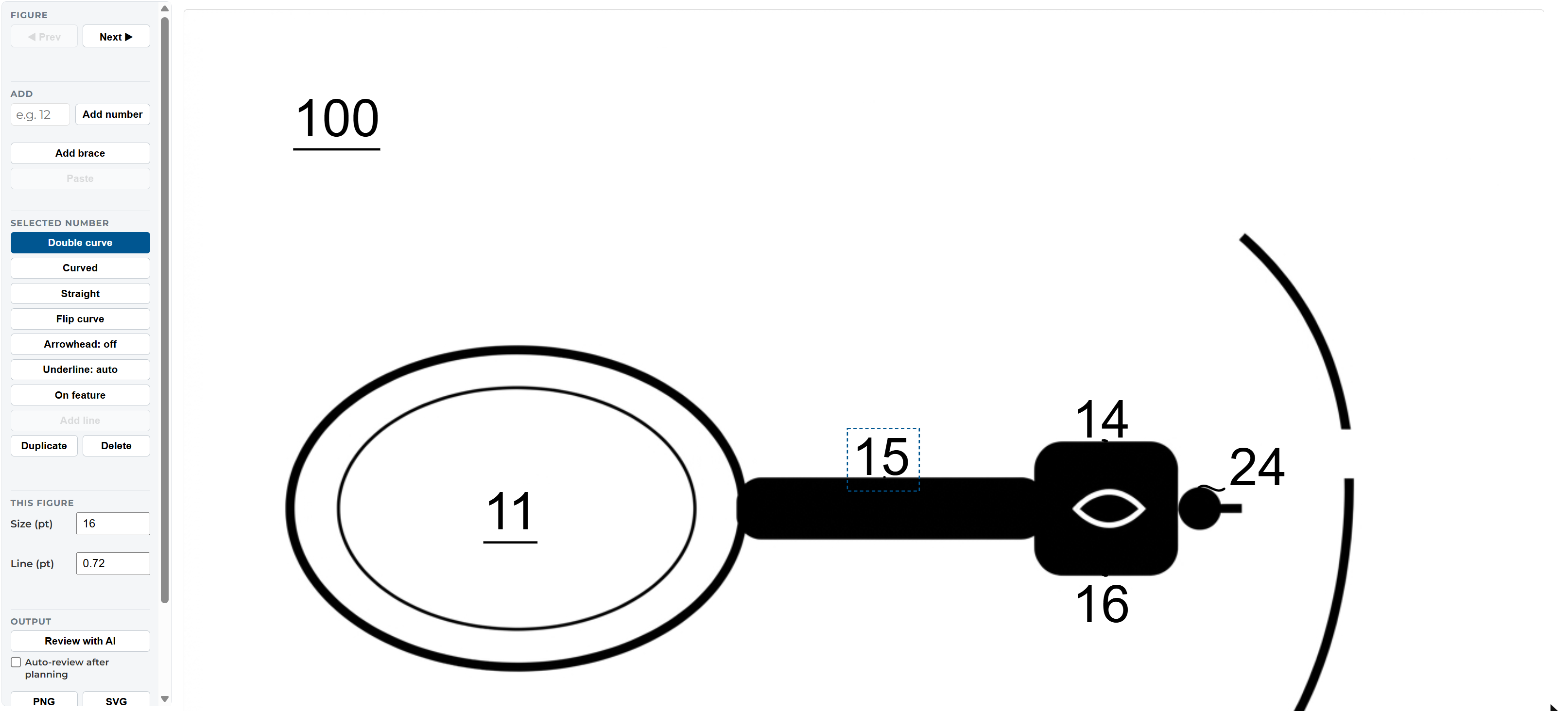
| Manual Placement | Drag numbers and their leader-line endpoints anywhere on the figure |
| Leader Styles | Straight, curved, or double-curved leaders, with an option to flip the curve direction |
| Arrowhead Options | None, at the feature end, at the number end, or both |
| Underline / On Feature | Print a bare underlined number directly on a feature instead of drawing a leader to it |
| Curly-Brace Grouping | Group several features under a single number |
| Multi-Select | Shift-click to select several numbers, then move, delete, duplicate, or copy/paste them as a group |
| Size & Thickness | Adjust reference-number size and leader-line thickness, per figure or across the whole set |
| AI Review | Runs a check on the placement and applies smart, uncluttered corrections that automatically adapt to your figure; can also run automatically after each figure is planned |
| Undo | Revert the last change in the editor |
Tips
- Let the editor place numbers automatically first, then use the manual tools to adjust only what needs it
- Run "Review with AI" (or tick "Auto-review after planning") after manual edits to catch crowding or crossed leaders
- Use On Feature placement for large, otherwise-blank features instead of adding another leader
- Multi-select is useful for moving or duplicating a group of related numbers together
- Once your figures are annotated, add them to the figure set below for export
Building Your Figure Set
Figures collected across the drawing modes appear in a shared figure-set tray for arranging and exporting:
- Reorder: Drag figures into the order you want
- Labels: Automatic figure labels (e.g. "Fig. 3A"), or set your own and they stick through reordering
- Export as Word: A4 pages, one figure per page, styled captions and page header, with an option to place a figure on a sideways page
- Export as ZIP: A .zip archive of the individual image files

Settings & Options
Model Selection
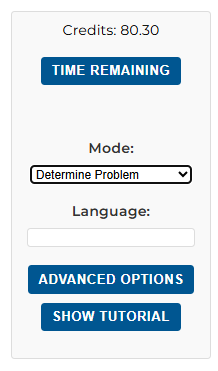
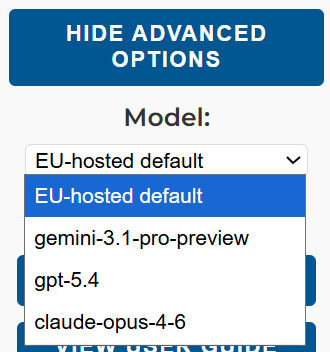
Click "Advanced Options" to reveal the model dropdown for the main drafting modes and Generate Drawings:
- EU-hosted open-source – Qwen/Mistral path on EU infrastructure
- Gemini – Frontier option, where enabled for your account
- GPT – Frontier option, where enabled for your account
- Claude – Frontier option, where enabled for your account
Note: Generate Drawings uses this same Advanced Options model dropdown. Convert Drawings to B/W has its own visible B/W Conversion Model dropdown instead.
Expert Drafting Options
Advanced Options also exposes a few extra controls depending on the mode and model in use:
- Drafting Profile: A Fast / Balanced / Thorough slider that trades speed for how much time the model spends on a given generation
- Enhanced-Accuracy Mode: An optional higher-accuracy mode for high-stakes claim 1 drafting, for cases worth the extra processing time
- Two-Part Claim Format: A checkbox to toggle two-part ("characterised in that") claim format on or off for Claim 1
- Chemistry Mode: A checkbox that switches Claim 1 drafting to a mode tuned for chemistry claims
Language
Specify your desired output language (e.g., "German", "French"). Leave empty for English.
Document Upload & PDF Chat
Every main drafting mode accepts a PDF, Word, or PowerPoint file alongside or instead of typed text. Once a document is uploaded, a "PDF chat" button lets you ask questions about it directly instead of only using it as drafting context.
Voice Dictation
Every chat box and free-text field carries a microphone button. Click to record, click again to stop; the transcript (produced by an EU-hosted speech-to-text service) is inserted at the cursor without being sent automatically, so you can correct it first.
Saved Projects
Claim Drafter autosaves your work continuously as you go—there is no manual save step. From the project bar you can:
- New: Start a fresh project
- Rename: Give the current project a name you'll recognize later
- Duplicate: Copy a project to branch off a variant
- Delete: Remove a project you no longer need
Reopening a saved project restores your claims, drawings, annotations, and figure set.
Credits & Time Remaining
The header displays your current credit balance and time remaining:
- Credits: Your available balance for using the application.
- Time Remaining: Once you use the tool, 0.4 credits will be deducted. The tool can then be used without limitations for 24 hours. This countdown shows how much time is left before the used end of this 24h period.
Live Progress
Longer operations—claim generation, drawing conversion, reference-number placement—show a live progress indicator with the current phase and step, so you can see the tool is working rather than wondering if it has stalled.
Chat Refinement
After generating any output, use the chat panel at the bottom to request modifications to the output. For text outputs, AI-proposed edits appear as a track-changes-style review: accept, reject, or reset each change individually, or accept or reject them all, before applying them to your claims.

Tips for Best Results
Input Quality
- Clearer invention descriptions yield better claims
- There is no limit on the input length
- Mention prior art limitations you want to overcome
- PDF, Word, and PowerPoint uploads can include text, drawings, or both—the AI reads everything
- Use text only, document only, or combine both for maximum context
- Dictate instead of typing in any chat box or text field with a microphone button
Workflow Efficiency
- Review and refine at each step before proceeding
- Use chat to make adjustments rather than restarting
- Review chat-proposed edits in the track-changes panel before accepting them
- Open Claim Drafter in a new window and use advanced options to try other models on the same input
- Data transfers automatically—no copy-paste needed
- Save projects as you go so you can branch variants with Duplicate instead of redoing work
Drawing Quality
- Use Edit mode for fine adjustments on SVG drawings
- Download as SVG for further editing in other tools, or PNG for a photorealistic figure
- Turn on Remove Wording before adding your own reference numbers, so old labels don't linger
- Let the reference-number AI review pass clean up placement, then adjust the remaining figures by hand
- Build your figure set as you go, and export it as a Word document or ZIP archive when your drawings are final